

How To Make An Animation In Unity 2d
Matt Bird writes all sorts of nonsense, but he enjoys writing animation tutorials for Unity.
Animating 2d objects in Unity is a adequately uncomplicated process, though information technology's not entirely self-explanatory. It's a bit different from 3D animation—which, depending on your graphic symbol model, can become incredibly intricate and complex—and requires a bit of setting up before you're ready to turn static sprites into a moving character. Let's see how it's done.

All sprites fatigued past me using GraphicsGale.
Prepping an Animation
In order to animate a 2D character you first need a sprite sheet. Sprite sheets are long, transparent images that incorporate all of the sprites you've created in a series of rows and columns. There are many programs you tin employ to create both sprites and sprite sheets; I personally adopt GraphicsGale, since I fiddle in pixel art. Which programme you utilise depends on your personal tastes, as well every bit the nature of your project.
Regardless of how you lot become about creating your sprite canvass—which will vary from program to program, so you lot'll need to go hunting for boosted tutorials later on this—you want to make sure that the .png your programme spits out has a transparent background. Often this entails choosing a single color as a groundwork / erasure colour (such as the dark dark-green in the sprite sheet example higher up) which serves as a reference betoken for transparent areas in the image. If that background colour is showing up in your .png outside of your editing programme, you haven't gear up your transparency properly.
One time you accept your sprite sheet y'all can drop information technology into the Project view in Unity. I propose making a folder specifically for that sprite canvass which can also contain every other file associated with the 2d character y'all want to animate, only that's up to you.
Screenshots taken by me. Unity endemic and developed by Unity Technologies.
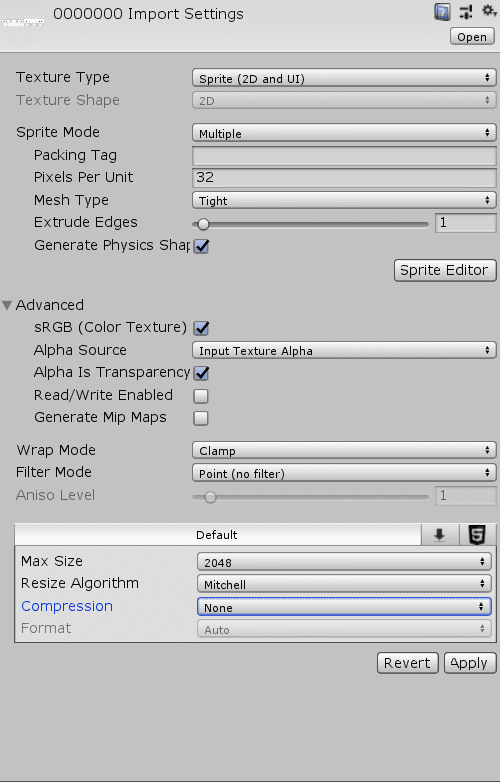
Click on your sprite sheet one time information technology is Unity and you'll bring up the Import Settings in the Inspector. The Import Settings determine how your sprites volition look when pulled into Unity, and how you manipulate these settings will vary from game to game. Since I'thou using pixel fine art I desire the sprites to look crisp, so I set Filter Mode to Point (no filter) and Pinch to None. Pixel art also tends to exist very modest, hence the name, so I fix the Pixels Per Unit to 32 to friction match the typical size of a sprite art game. This creates a sizable prepare of sprites to drop into a scene. Hit Use at the bottom to save your settings.
Regardless of how large you want your sprites to exist, I highly recommend you set the Pixels Per Unit to the same size for every piece of art you import into Unity. If your grapheme is 32 PPU, your backgrounds should also be 32 PPU. And so should any other characters, enemies, effect animations, and so forth. Setting everything to a different PPU tin can look very strange if you're not careful.
Regardless of your other settings, you lot will want to change Sprite Mode, correct at the top, to Multiple. Then click the Sprite Editor push button a few fields downward. This will bring upwardly the Sprite Editor window.
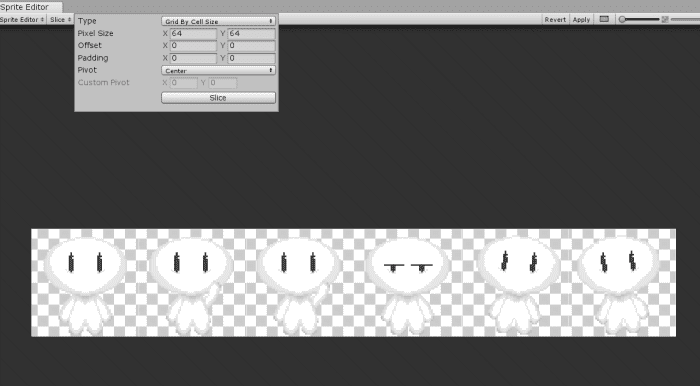
The Sprite Editor window allows you to manipulate individual frames and mess with a variety of settings that tin produce a wide range of effects. For our purposes, nonetheless, we but demand to use the Sprite Editor to splice up our sprite sail. Currently, if you pull the sprite sheet into Unity yous'll go a GameObject that consists of every sprite on your sheet, and that'south not what you want.
Get up to Slice at the top of the Editor. This will pull up the Slice menu, pictured higher up. Hither you lot can subdivide the sprite sheet into smaller images that Unity will later interpret as split up frames for your animations. How you slice your sheet is up to you, just my preference is to ready Blazon to Filigree By Cell Size, and then enter the verbal dimensions of a unmarried frame of my sprite. Graphics programs that create graphic symbol sprites typically piece of work frame-by-frame, then it should be piece of cake to find the dimensions of your frames by checking your graphics program. In this instance, I created each of my frames to exist 64 ten 64 pixels, so I enter the Pixel Size to be 64 and 64. This chunks the sprite sheet upward into 6 unlike frames, denoted by faint white lines that announced in the moving picture below the menu. If these lines bisect your images at any point then you lot don't have the correct dimensions.
Hitting Utilise to relieve your Piece settings, so close the window and get back to the Projection window. If you followed the instructions above, your sprite sheet should look similar this:
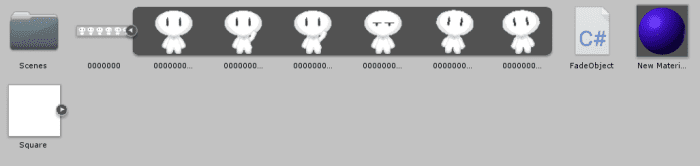
Each frame tin now exist pulled individually into your project and used equally its own GameObject.
Scroll to Go on
That was a lot of prep, but you lot're finally ready to breathing. On to the side by side step.
Creating an Animation
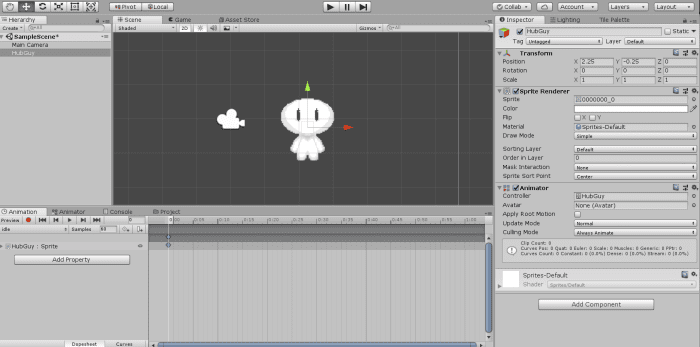
To create an Animation in Unity you start need a GameObject. Pull i of the sprites you chose out of your sprite canvass (if you're working with a graphic symbol information technology will probably be an 'idle' blitheness, such equally your guy just continuing around on the screen) and drib it into the Scene view. Unity will add a Transform and a Sprite Renderer to your GameObject, and you can rename it to whatsoever you lot similar.
Next, you want both the Animator and Animation tabs. If they aren't on your Unity screen past default, you can add together them by going up to Window, then scrolling down to Animation. Animations are the individual frame-by-frame sequences that make your grapheme motility; Animators are small processing units that tell GameObjects which Animations they tin can access, as well as allow Unity to trigger Animations from script. You lot need both to animate a GameObject.
Click on the Animation tab and you lot'll see a small-scale notification telling you to add an Animator and an Animation Clip. We'll start with an idle pose for our character. Click on the push button about this notification and you'll exist prompted to create your kickoff Animation Clip; we'll name it 'idle'. Notation the .anim file type. All Animation Clips are .anims.
This volition also create an Animator component on your GameObject every bit well as a Controller that stores all of the Animator's Animation Clips. It will appear equally a .controller file in your Assets. I recommend moving all of the files you create—Animation Clips and Controller—to the same folder as your sprite sheet for ease of admission. You should as well create a Prefab of the GameObject you're working on, and so drag the GameObject down into the folder in Project view as well.
You're now ready to create an Animation. Once you've clicked on your animatable GameObject y'all tin access a timeline via the Blitheness tab. This is where you tin drib your frames and test the Animation Clip. In this example, 'idle' already has the frame we desire to use, though if your idle animation had more frames—if he dipped up and downwardly, for instance—you would drop them onto the timeline subsequently the initial frame. You can then arrange how quickly or how slowly the blitheness runs by changing the Samples number from 60 to whatsoever you like.
One animation is done. Allow'southward create a new one. Click on the drop-downward menu abreast the Samples number and you'll see a full list of all the Animations stored in your GameObject'due south controller. Click Create New Clip and you'll be prompted to, again, create and salve a new prune with a specified name. We'll name this 1 'walk'.
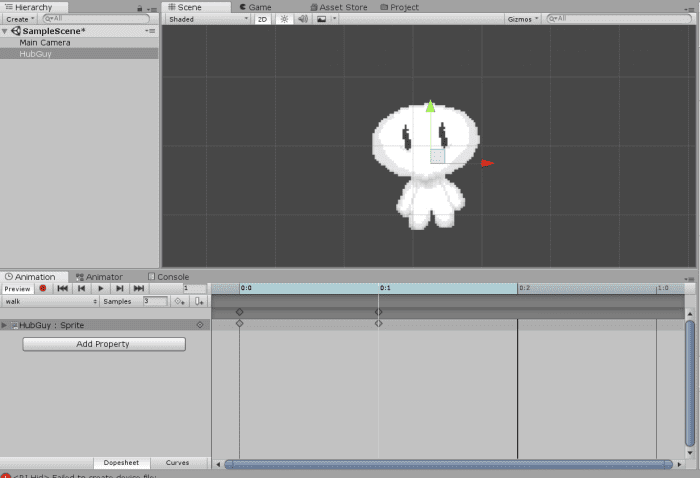
'walk' requires two frames, in this case, so nosotros have the last two frames on the sprite sail for this character and drop them onto the timeline. These go keyframes, which help dictate the flow of the Animation Clip. Set Samples to something low and hitting the Play push and he'll perform a sort of stumble walk. (Trust me when I say that it doesn't look all that impressive. Y'all're not missing much.) The Animation Clip loops once it hits the outset frame without a keyframe, so later taking his second pace he'll loop back to the first. And then long as this Animation Clip is active he'll now walk forever.
And that's that! You now have a (very basic) animated GameObject in Unity! Using your sprite sheet you can create as many Animation Clips as you like in the same way, assuasive your character to attack enemies, open doors, tap their face when they're confused, or any else you lot fancy. In one case yous get used to the procedure it merely takes a few minutes from completion of a sprite canvas to animating a character. You can also use C# scripts to admission animations in specific instances using the following reference:
yourObject.GetComponent<Animator>().Play("yourAnimationName");
If your grapheme gets hit by an enemy, for example, you can code your game to swap to a "damaged" animation, and your character will immediately do so upon hitting an enemy, assuming they have the proper Animator attached. Yous can even store Animation Clips as variables and then as to access specific animations without the use of a string.
Advanced Tips
At that place's a lot more to animative GameObjects in Unity, of form, and covering every base of operations goes way beyond the scope of this commodity. Notwithstanding, let's have a expect at a few quick tips to get you started on making and utilizing animations higher up and across the nuts:
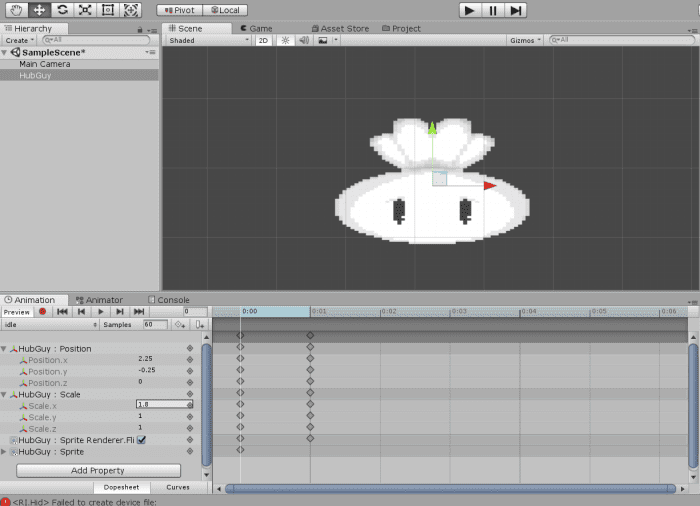
- You can create additional furnishings for your Animation Clips past manipulating Properties. Click Add together Holding while editing an Blitheness Clip and you'll meet a list of options—unremarkably Transform and Renderer / Sprite Renderer—which aggrandize into means to change the look, size, rotation, layer, opacity of your GameObject, amidst other things. You can besides set each of these Properties to be unlike for each keyframe—for example, if you wanted to make your GameObject fade out as part of an blitheness, you could set its Color.a setting to 0 on the concluding frame of the animation, causing its opacity to gradually shift from visible to invisible by the end of the Animation Prune.
- Y'all can also manipulate the Properties of whatever child objects attached to your GameObject via Animation Clips. Children will announced in the same drib-downwardly menu as other Properties, and each can exist altered in the same means as mentioned higher up. Child objects for the average GameObject can include weapons, shields, items, dress, eyes, mouths, and enough else.
- Information technology is highly recommended that you lot do not change the Position of a parent GameObject via Properties. Position coordinates apply to Global infinite in Unity for parents, so if you animate your character to move upward when performing a jumping blitheness they will instead motion to those specific coordinates whenever you trigger the animation. That said, child objects of a parent utilize local coordinates, so if you move a weapon or a shield up or down during an animation they will always move relative to the Position of the parent object.
- Animation Clips are gear up by default to loop indefinitely. To change this, find the Animation Clip's .anim file in your Project view and check information technology in the Inspector. Unclick Loop Time. This way the Animation will only play once, halting the GameObject on the appearance of the final frame.
- Animation Clips are specific to their original GameObject. Consequently, you tin can't create a generic 'walk' blitheness and utilize it to every GameObject, every bit it will also carry over the frame from the first Animation Clip and magically transform the new character into the old one during the duration of the Blitheness. There are more complex means around this, but for the most part, each animated GameObject will need its own set of Animation Clips.
© 2020 Matt Bird
Source: https://turbofuture.com/graphic-design-video/How-to-Create-2D-Animations-in-Unity
Posted by: quinnsprome.blogspot.com
0 Response to "How To Make An Animation In Unity 2d"
Post a Comment