

Decorating Frosted Round Christmas Cookies Clipart
This post may contain affiliate links. For more information, see our privacy policy.
Don't fancy yourself as a fancy cookie maker? Check out these Easy Decorated Christmas Cookies, they're one-bowl, no-mixer and simply delish!
Happy December! Hope this post finds you beginning to get prepared for lots of sweet celebrations with family and friends this month. We are finally feeling a bit more settled in our new home in the mountains of North Carolina. The chilly temperatures here, along with the reality of the quickly approaching holidays, has got me in the mood for baking. I can't wait to share several new holiday recipes, including these Easy Decorated Christmas Cookies.

Believe it or not, we've already had a snowfall! Earlier this week we had dinner at our son Nick's house in Asheville. When we left, we were shocked as a heavy dusting of white was already covering the ground. I quickly checked out the hourly forecast: "0% chance of precipitation all night long." "So, it's just a brief flurry", we thought. But by morning, there was enough snow to call off school in Asheville! Surprise, surprise!

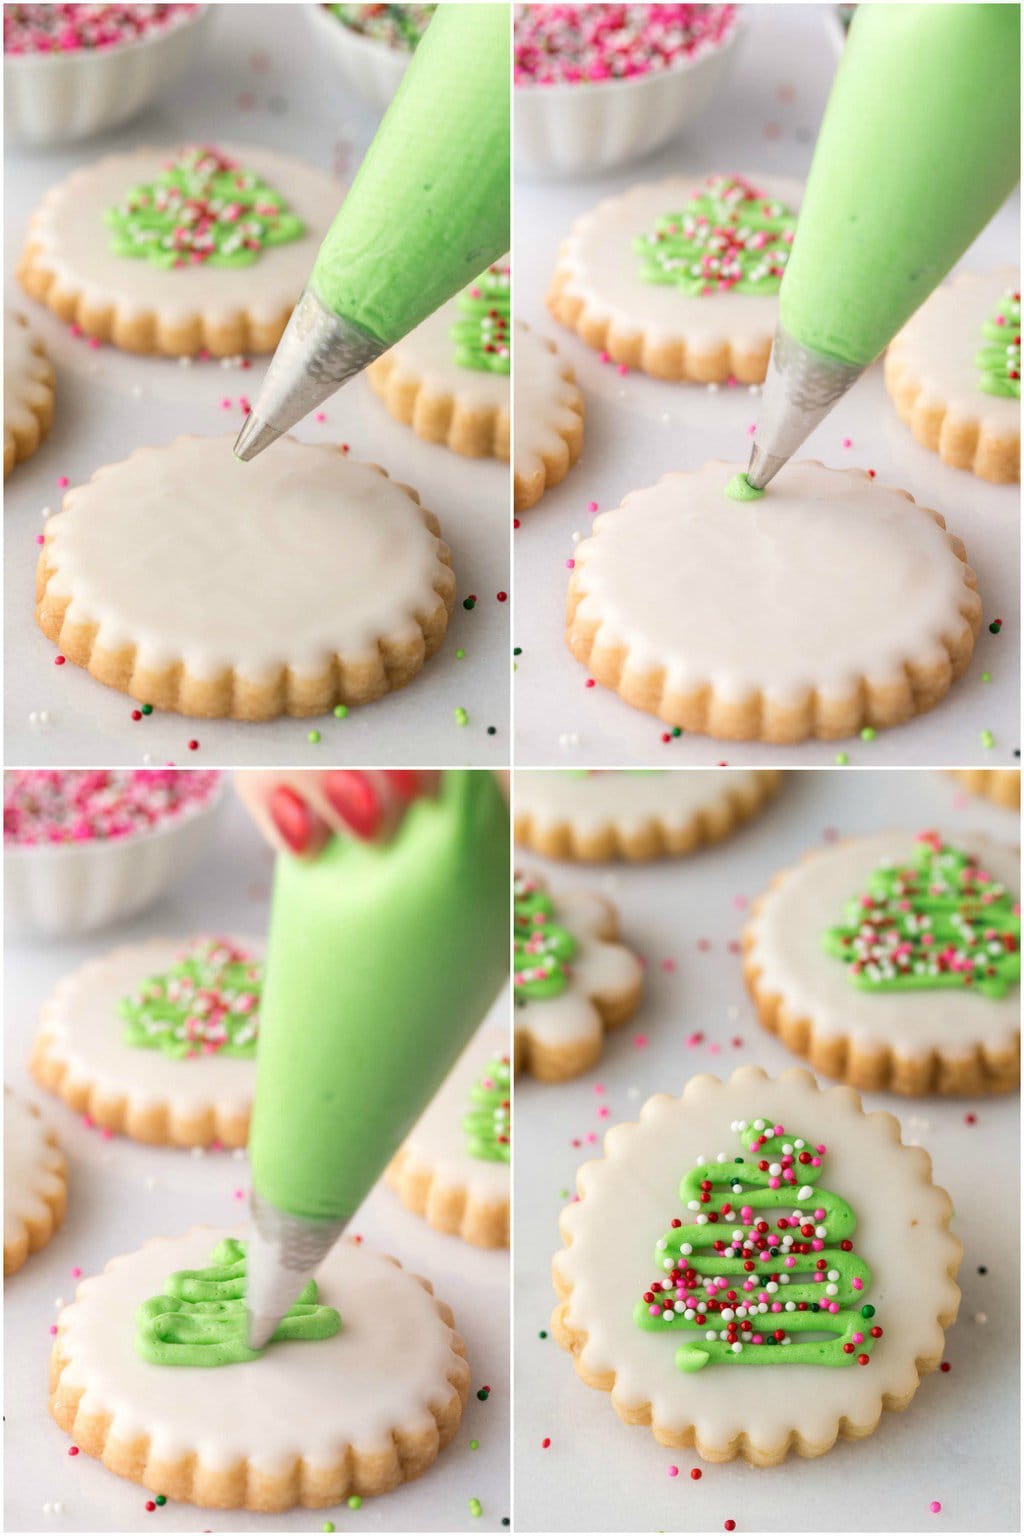
Snow in the mountains was actually one of my inspirations for these cookies. I wanted them to be a simple representation of an evergreen tree on a snowy night. It's an easy technique, as you will see from the step-by-step tutorial below. Stir together the dough (one-bowl, no-mixer) and roll it out. Cut the cookies, chill, and bake.

To decorate, make a simple two-ingredient icing in deep blue and dip the cookies to coat the top. Sprinkle with the snow sprinkles then you're almost done. After the cookies are set squiggle on a simple white tree, add more sprinkles and you've got a snowy night in the mountains!
These Easy Decorated Christmas Cookies are also a bit of a take-off on my Christmas Shortbread Cookies from last year. I was so happy to come up with a pretty Christmas cookie that didn't require any decorating expertise. Apparently, they made other bakers happy too, as I've gotten lots of comments and emails about these festive cookies. They've been pinned over 302,000 times!
A dreamy dough
I use this easy shortbread dough for so many of my cookies because it's a dream to work with. There's no chilling before rolling and it doesn't stick easily to the counter or rolling pin. A bit of cornstarch in the dough (and a stint in the fridge after being rolled) helps keep those nice, crisp edges in the oven.
How to roll dough to an even thickness
You might be a pro, but I have trouble rolling dough to a consistent thickness. There are several tricks to help remedial rollers like myself to achieve that even thickness. I've found that the easiest technique is to use a rolling pin with graduated rings on the ends. You simply choose the thickness you want (1/16, ⅛, ¼, or ⅜-inch) and roll away perfect cookies! The rings are removable, so you can use it as a conventional rolling pin as well.

Café Tips for making these Easy Decorated Christmas Cookies
- Because there's no mixer used, the butter needs to be very soft when mixing up these Christmas Shortbread Cookies. That can be difficult at this time of year, even if you let the butter sit out for hours. A short stint in the microwave on the very lowest power level (on mine, it's 10%, check to see what yours is) works like magic to soften butter. You'll need to experiment a bit with your microwave though, as they're all different. Start with 20 or 30-second increments at power level 10 until you learn how long your microwave will take to get the butter nice and soft, but not melted.
- I used peppermint extract in my glaze and buttercream. Feel free to use other flavorings. Almond, vanilla, orange, lemon and coconut extracts are also delicious.
- Flavor extracts can vary in intensity. It's better to start with a small amount in the icing, then take a little taste. You can always add more, but you sure can't remove it!
- The recipe calls for a one hour (or longer) chill for the cutout cookies. If I'm in a big hurry, I just pop them into the freezer for 10-15 minutes (don't tell anyone I cheat!).
- A few tips on rolling and cutting out cookies:
- Keep your work surface and rolling pin lightly dusted with flour.
- I also like to rub the cutting edge of my cookie cutter in a little flour in between each cookie.
- Press fairly firmly when cutting out the cookies, but don't twist the cookie cutter as the shape will get distorted.
- If you don't have room in your refrigerator to chill the cookies on two sheet pans, just transfer all of them to one pan after cutting. Then later, once they're chilled, you can divide them between the two pans for baking.
- When re-rolling the scraps, incorporate as little of the flour on the work surface as possible.
- Occasionally, some of the cookies will be slightly puffed on the top when removed from the oven. You can give them a nice flat top by pushing on the top gently with a metal spatula.
- Sometimes the glaze for these cookies will have lots of bubbles. These bubbles will cause imperfections in the surface of the glazed cookies. Simply stir the glaze very slowly to get rid of the bubbles.

- I love to have a supply of these super sturdy decorating bags. They're not expensive, and a box will last forever. The bags come in a nice flat box, so they're easy to store. I used to buy my bags at the local craft store and got about 10 bags for slightly less than this whole box of 100 bags! Definitely a wonderful deal.

- I love these pre-cut parchment paper sheets when making cookies. They the perfect size for a cookie sheet pan and also come in a nice flat box for easy storing. This 100-pack will last forever - and save you some time and hassle.
- I have a hard time piping the Christmas trees in consistent sizes so I came up with a little trick to help me. I cut out a small paper tree, lay it on each cookie before piping and lightly cut along the sides of the paper with a small sharp knife. I then pipe my trees to just cover the cut. Voila! All the trees are the same size.

- I used Wilton Delphinium Blue paste food coloring.
- Don't roll these cookies too thin, otherwise, they will be difficult to dip into the glaze when decorating. I roll mine to a ⅜-inch thickness and use an adjustable rolling pin. How do you roll them to the desired thickness? This reasonably priced rolling pin is a super easy way to achieve the same perfect thickness for all your cookies. It has 1/16, ⅙, ¼, and ⅜-inch removable discs, making it easy to flatten your dough to a uniform thickness. Have a baker on your shopping list? This would make a lovely gift that can be used year round.You might even be the lucky recipient of some perfect, even Easy Decorated Christmas Cookies!

So you can stop looking for your signature holiday cookie for 2018. Whip up a batch of these Easy Decorated Christmas Cookies; I think you'll be sure to hear lots of oohs and ahhs when you pull out the coffee pot and cookie platter.

Two other fun Christmas cookies for your baking pleasure!

Christmas Tree Shortbread Cookies
Christmas Shortbread Cookies

Servings: 16
Calories: 185 kcal
For the cookies:
- 8 ounces very soft salted butter 2 sticks
- ½ cup powdered sugar
- 1 teaspoon vanilla extract
- 1 ¾ cups all-purpose flour
- ¼ cup cornstarch
For the mint glaze;
- 2 cups powdered sugar
- 4 tablespoons half and half or milk, maybe more
- ¼-1 teaspoon peppermint extract
- blue paste food coloring I used Wilton Delphinium Blue
For the cookies:
-
Line 2 sheet pans with parchment paper. Set aside.
-
Place soft butter in a medium-size mixing bowl. Stir with a wooden spoon or sturdy spatula until nice and smooth. Add powdered sugar and vanilla. Mix together by hand for about 30 seconds, until fluffy and well blended.
-
Sprinkle the flour and cornstarch evenly over the top. Stir until flour is incorporated and the dough is shaggy. Turn out onto a lightly floured surface and press dough in a ball. Knead a few times until fairly smooth then form into a ball again and press with your hands into a flat disk.
-
On a lightly floured work surface, roll out dough to a ⅜-inch thickness. Keep work surface, dough and rolling pin lightly dusted with flour. Cut circles and place on prepared pans. Re-roll scraps as many times as needed to use up the dough.
-
Place cutouts in the refrigerator for at least one hour or up to 24 hours.
-
When ready to bake, preheat oven to 350˚F. Remove cookies from refrigerator and bake for 12-16 minutes or until just beginning to turn golden at the edges. Rotate pans halfway through for even browning. Cool completely before icing.
For the mint glaze:
-
Combine powdered sugar, half and half and ¼ teaspoon peppermint extract in a medium-size bowl. Mix until smooth. The glaze should be thick but pourable. Add a little more half and half if too thick. Taste the glaze and add more peppermint extract, if needed (see note above in the post). Dip the tip of a small knife into the blue food coloring and swirl some of it into the icing. Stir well and add more food color until desired shade of blue is achieved. Transfer the glaze to a shallow bowl.
To glaze the cookies:
-
Holding onto the edges of a cookie, dip the top surface into the glaze, being sure all of the surfaces touches the glaze. Pull cookie up and out of the glaze. Allow excess glaze to drip back into a separate bowl. When glaze stops dripping, quickly flip the cookie right side up and give it a gentle jiggle to allow the glaze to flow evenly over the surface. Repeat with remaining cookies. Allow glaze to dry for 15-30 minutes.
-
For the buttercream piping:
-
Place butter in a medium-size bowl and stir until smooth. Add powdered sugar, 1 ½ tablespoons half and half and mint extract and stir vigorously until smooth, adding a bit more half and half if needed to achieve a fairly thick but smooth consistency.
-
Place buttercream in a pastry bag fitted with a small round icing tip (I used a Wilton #5 round tip). Starting at the upper edge of one cookie, pipe the Christmas trees by making lines that are increasingly wider, stopping about ¼-inch above the lower edge of the cookie (see pictures above). Immediately sprinkle trees with a few more white nonpareils. Set aside to dry.
-
See Café Tips above for lots of extra tips and instructions.
See Café Tips above for lots of extra tips and instructions. The recipe makes 15 large (3-inch) or two dozen smaller (2-inch) cookies.
The recipe makes 15 large (3-inch) or two dozen smaller (2-inch) cookies.
Once cookies have been dried for several hours, they can be stacked in an airtight container.
Calories 185kcal
Fat 12g
Saturated fat 7g
Cholesterol 33mg
Sodium 109mg
Potassium 20mg
Carbohydrates 16g
Sugar 3g
Protein 1g
Vitamin A 390%
Calcium 9%
Iron 0.6%
The Café Sucre Farine is a participant in the Amazon Affiliate Program. The Amazon Affiliate Program is designed to provide a means for sites to earn advertising fees by advertising and linking to products on Amazon. The price you pay as a consumer does not change, but if you make a purchase through one of our links, we receive a small commission – and we continue delivering delicious recipes to you!
You may also like:
Decorating Frosted Round Christmas Cookies Clipart
Source: https://thecafesucrefarine.com/easy-decorated-christmas-cookies/
Posted by: quinnsprome.blogspot.com
0 Response to "Decorating Frosted Round Christmas Cookies Clipart"
Post a Comment